This document will serve as a comprehensive list of things you should know about recording with Streamlabs Desktop. First, we’ll cover key features, including Multi-track Recording and Selective Recording, and then provide a breakdown on settings you can adjust to get the best recording quality. Download Streamlabs Desktop and start recording your gameplay today.
Please note, this tutorial will specifically cover the best settings to record only. Many of the settings we discuss here will have to be adjusted for performance and quality if you want to live stream and record simultaneously.
Selective Recording
Selective Recording, a revolutionary feature unique to Streamlabs Desktop that allows you to pick and choose the sources that appear in a recorded video of your live broadcast.
This means that the sources your viewers see when they watch your live stream can be removed from a recorded video. Similarly, you can add additional sources to a recorded video without having them appear on your livestream.
For example, if you like to upload a montage of highlights from your live stream, you may want to focus solely on the gameplay and remove your alert box from appearing in the recording. With Selective Recording, you can adjust your alert box so that it will only appear in your live stream while remaining hidden in the video recording.
Enabling Selective Recording is simple. The process has been fine-tuned and optimized, so you only have to toggle a few buttons to pick and choose which sources appear in your recording.
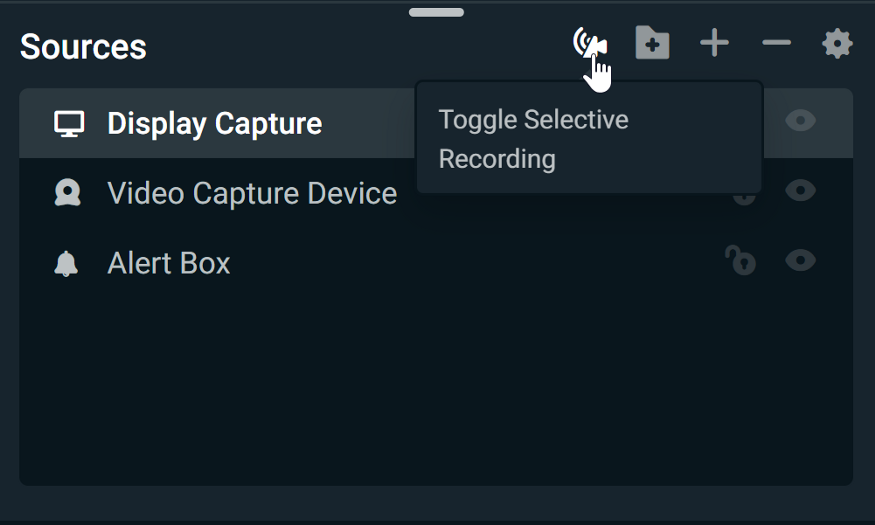
Step 1: From the Streamlabs Desktop Studio tab, navigate to the Sources window and click on the Selective Recording Icon
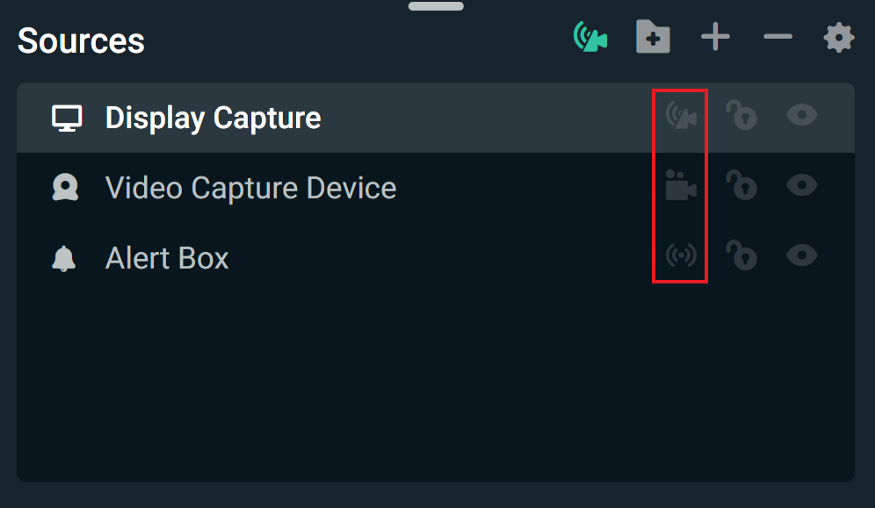
Step 2: Once enabled, new icons will appear next to your sources in the list
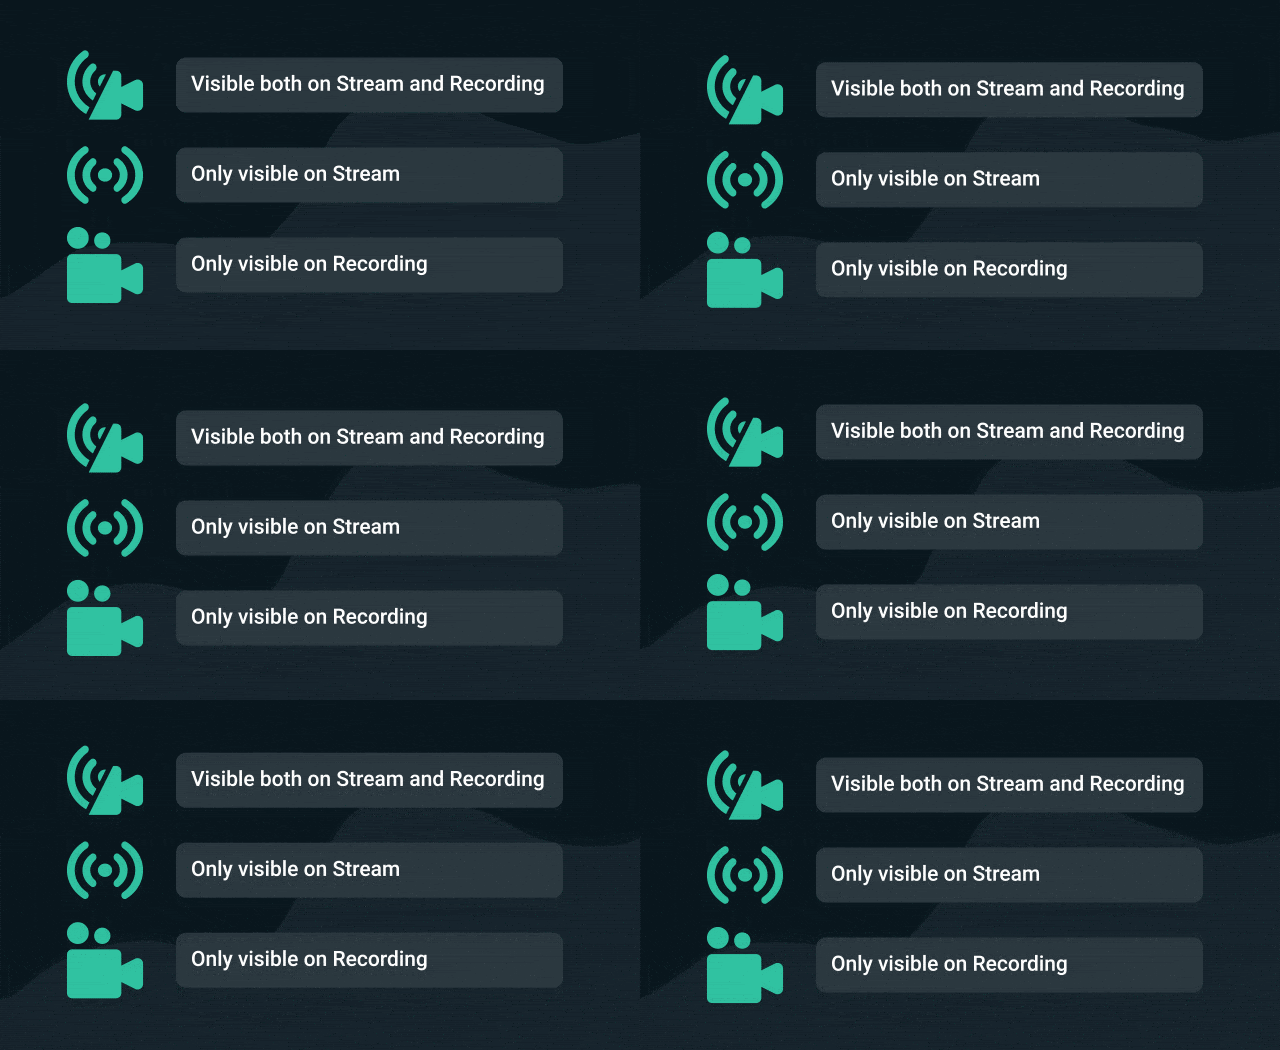
Step 3: These icons indicate where you are showing your source. They default to appear on both the live stream and the recording. Simply click this icon to change the source’s destination.
Instant Replays/Replay Buffer
Streamlabs recently introduced an Instant Replay widget that utilizes our Replay Buffer to record content and play it back on your stream at your command. To enable Replay Buffer and use Instant Replay.
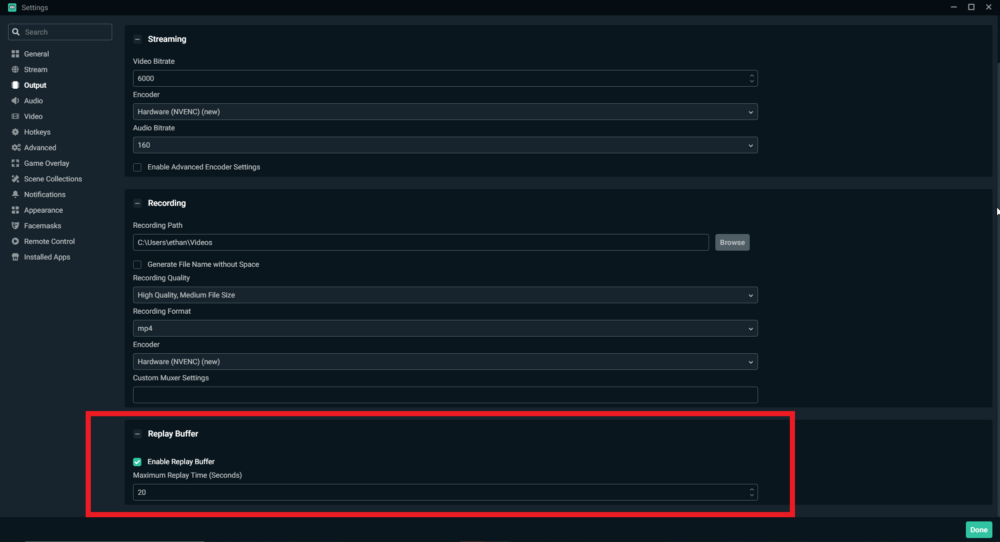
- Open Streamlabs Desktop settings
- Go to Output
- Check the box for Enable Replay Buffer
- Set the length to your desired time.
- Note: Longer replay buffers require more memory (we’ll use 20 seconds).
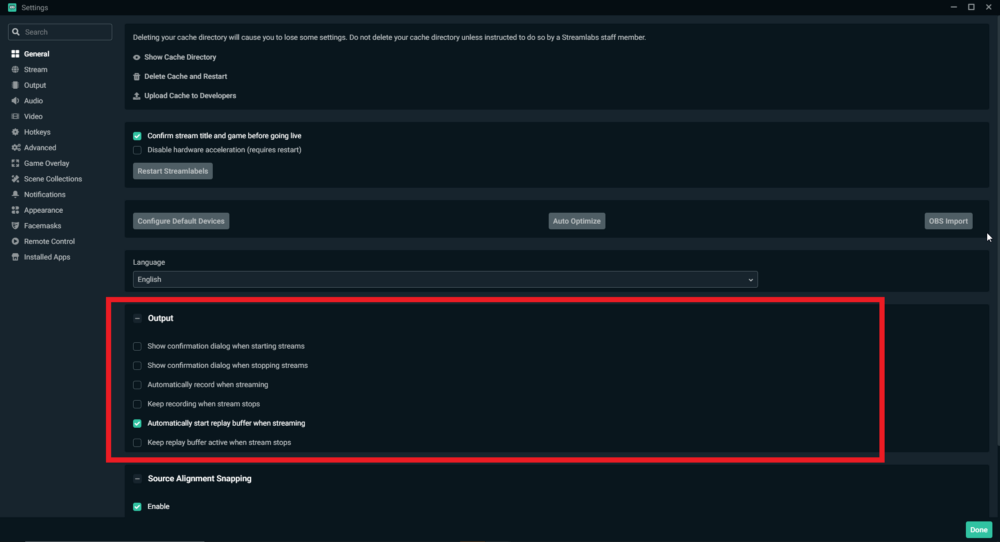
Next, navigate to the general settings and check the box next to “Automatically start replay buffer when streaming.” This will turn on replay buffer as soon as you start streaming. If you are the type of streamer utilizing replays often, this is a handy tool to ensure you don’t forget to turn it on and possibly miss out on a great play.
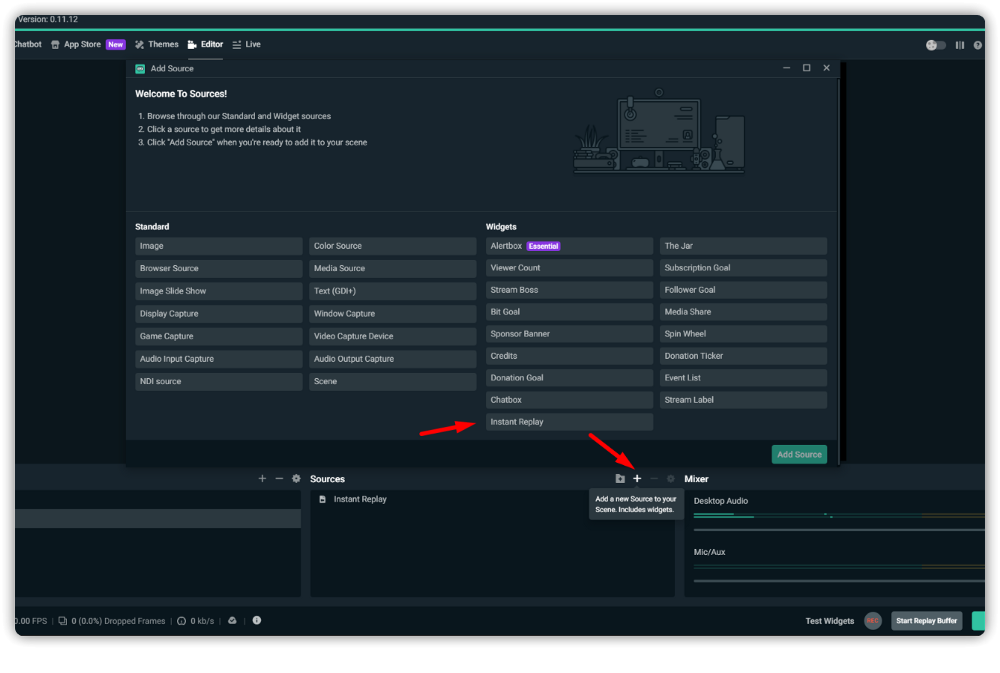
Now, add a new source to the current scene and choose “Instant Replay.”
Set Your Hotkeys
To seamlessly use Instant Replays while you stream, we recommend configuring your Hotkeys.
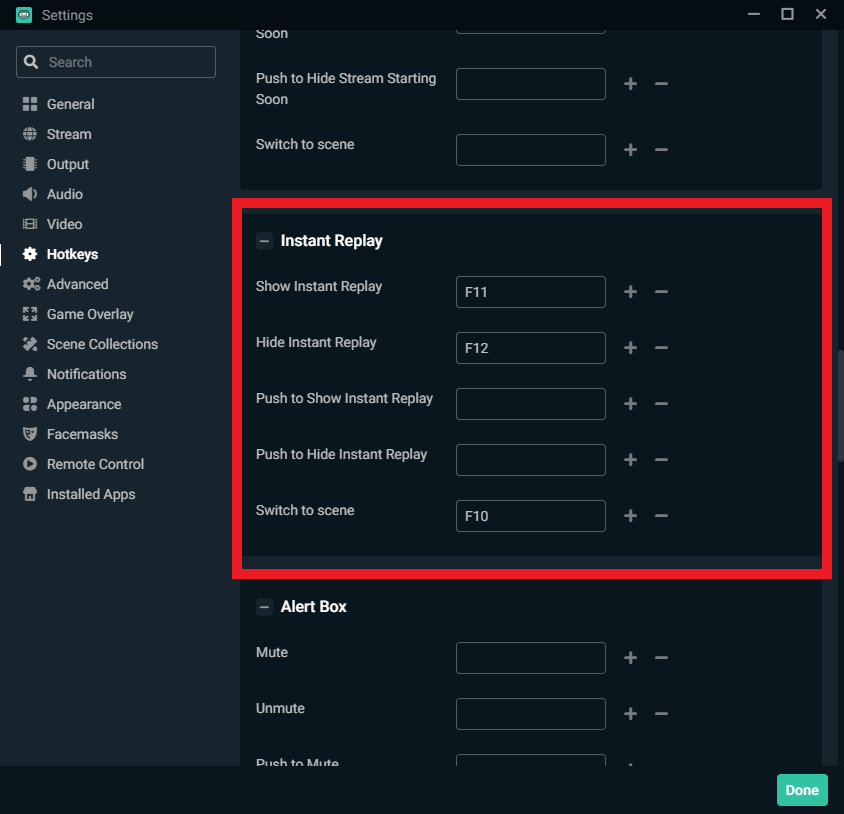
For example, you can save a replay, hide or show your instant replay source, and even switch to a scene with the instant replay source in it.
We highly recommend setting a hotkey to save a replay. That way, at any given time, you are ready to capture your best moments.
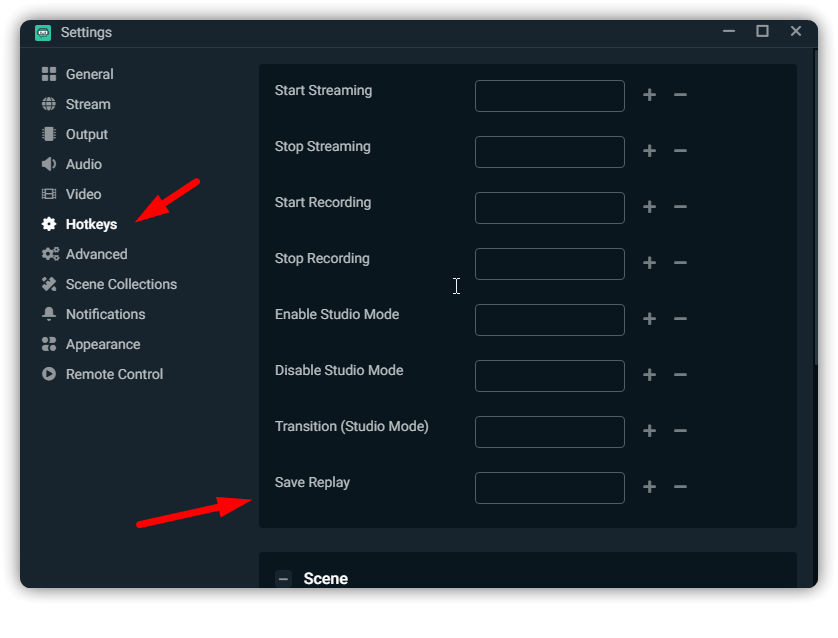
Using this hotkey, you can save the last 20 seconds of your stream since that is the duration we set in the settings above.
Other Hotkeys give you additional flexibility on how and when you show your Instant Replay. For example, you set a hotkey to show or hide the source, and if you are really fancy, you can even dedicate a scene specifically for Instant Replays and use a hotkey to switch to the scene.
Now you can close the settings page. To test the replay buffer and get comfortable using it before going live, you can click on “Start Replay Buffer” towards the bottom right of Streamlabs Desktop. Remember, Replay Buffer will automatically turn on when you start streaming.
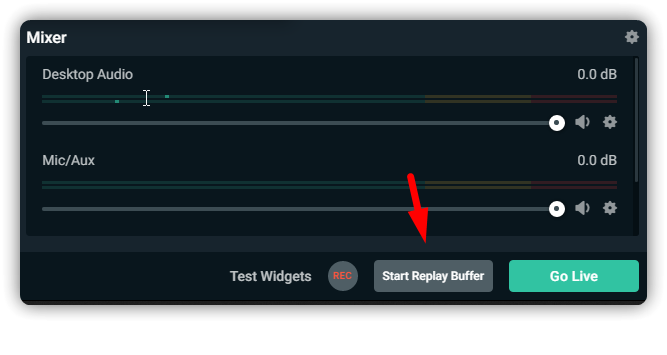
Now your Instant Replay feature is ready. Simply press your chosen hotkey combination, and the last 20 seconds will play as a media source in your editor. You can also resize the source and move it around.
Highlighter
Highlighter is a free video editing tool exclusive to Streamlabs Desktop that offers an easy way to edit and create highlight videos from live stream replays. The tool is free and available now.
The Streamlabs Highlighter video editing tool works in conjunction with Replay Buffer. The best part is that we’ll automatically configure the Replay Buffer tool and help you set up hotkeys during the setup process, ensuring capturing your clips is quick, easy, and painless.
Please note: When you start streaming, the replay buffer is activated automatically. At this point, you can press your hotkey at any time, and Streamlabs Desktop will automatically save and store your captured clips in the Highlighter tab. However, one great feature of the replay buffer is that you don’t actually have to be streaming to capture clips. After you’ve gone through the setup process for Highlighter, you can also manually activate the replay buffer, and Streamlabs Desktop will still capture and store any replays you want to save without having actually to be live. To do this, simply click the “Start Replay Buffer” button next to the “Go Live” button.

Now, here is how you set up our Highlighter video editing tool in Streamlabs Desktop!
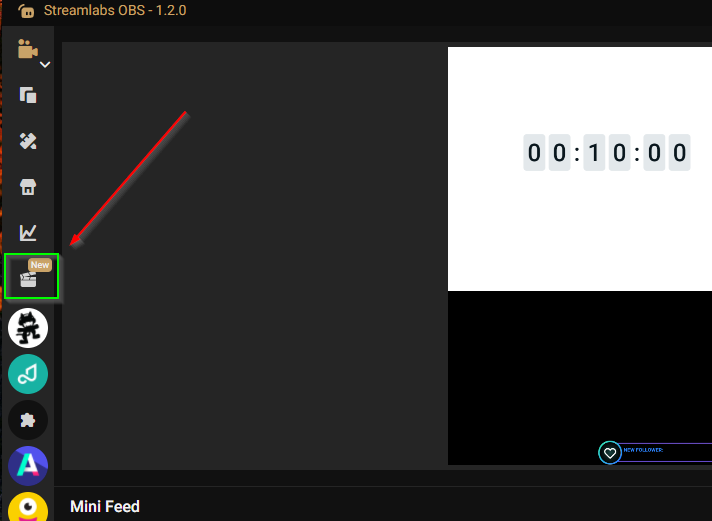
Step 1: Open Streamlabs Desktop and click on the new Highlighter tab from the navigation on the left-hand side.
Step 2: Click on “Configure” to enable replay buffer automatically.
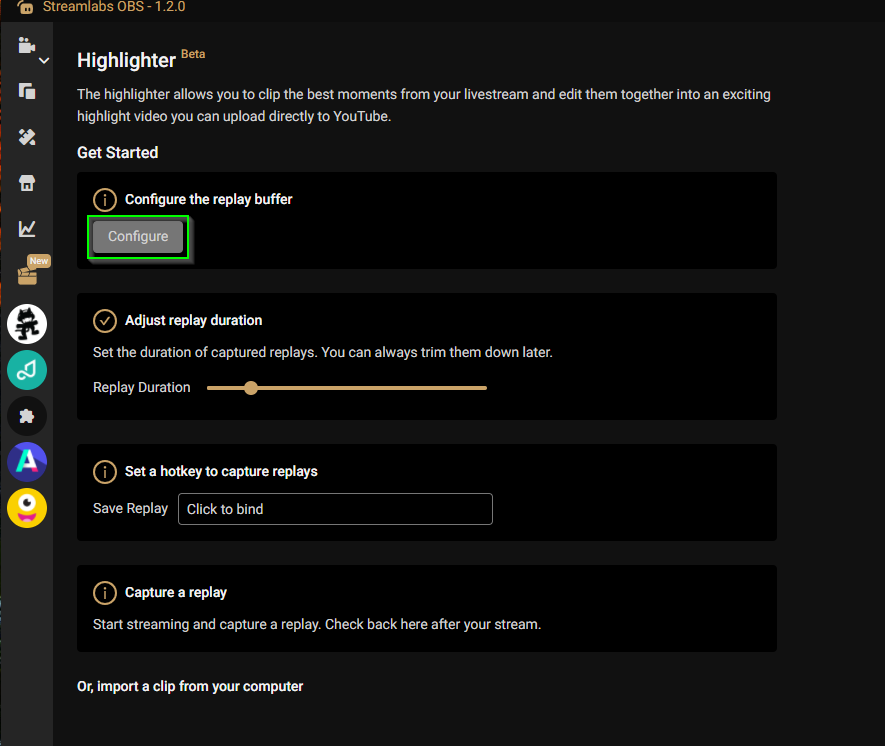
You will see a confirmation message when the replay buffer is correctly configured.
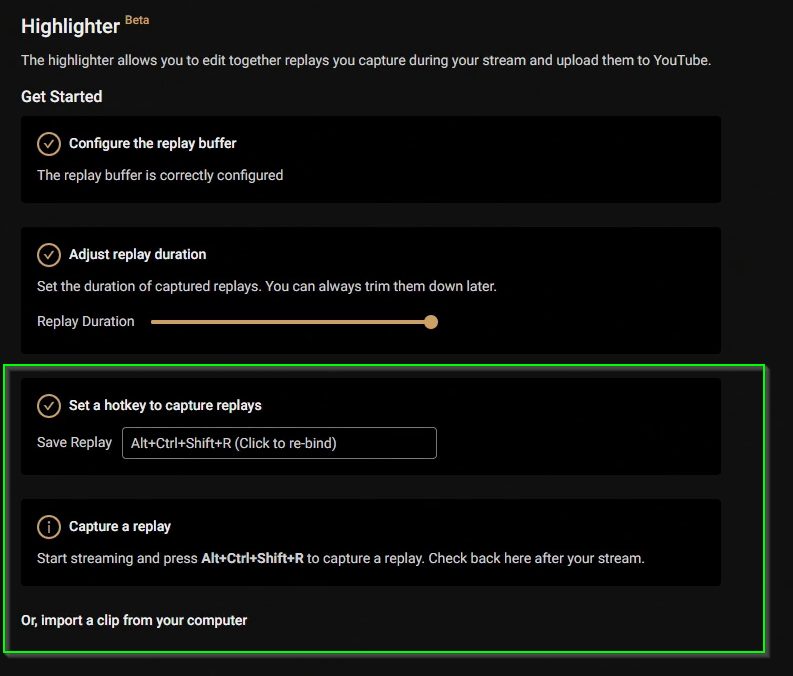
Step 3: Set the replay capture duration. You can record for up to two minutes or as little as one second.
Step 4: Configure your hotkey settings for replay capture, and remember to use your hotkey to save replays while streaming.
How to Edit Your Clips
Now that you have captured some replays, it’s time for the fun part: Editing your clips. The Streamlabs Highlighter video editing tool is easy to use and designed to be as user-friendly as possible. No knowledge of video editing software is required.
View Your Clips
After your stream, all of the clips you saved will appear in the Highlighter tab.

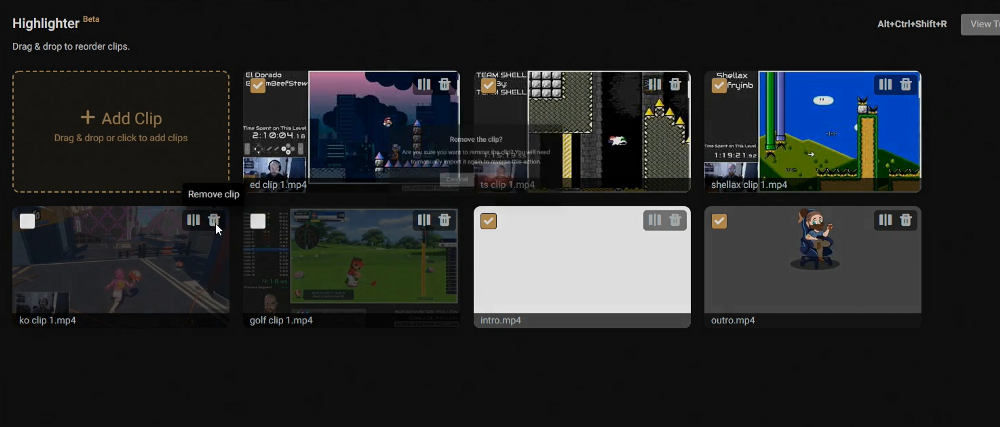
Import Additional Videos
You can even add extra videos, such as an intro or outro, to make your video look even more professional.
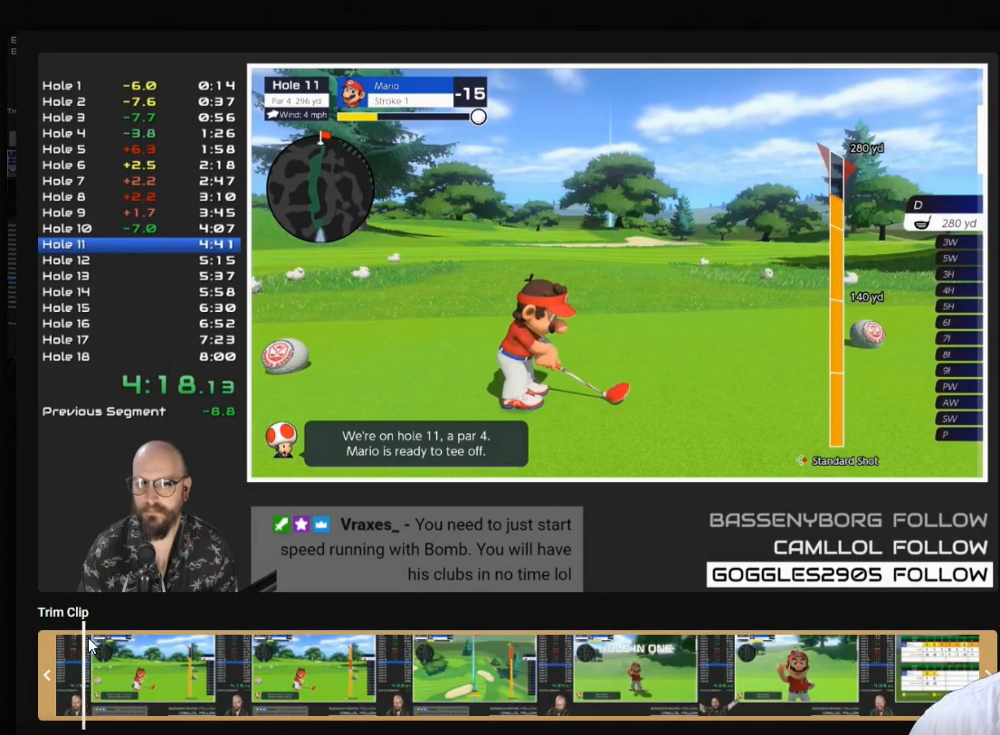
Trim Clips
Clips can be trimmed by dragging the frame to specific start and endpoints. Trim your clips here to remove any unnecessary footage.
Reorder Your Clips
Your video will show clips in the order they appear from left to right. You can simply drag and drop the clips to reorder them.
Add Transitions
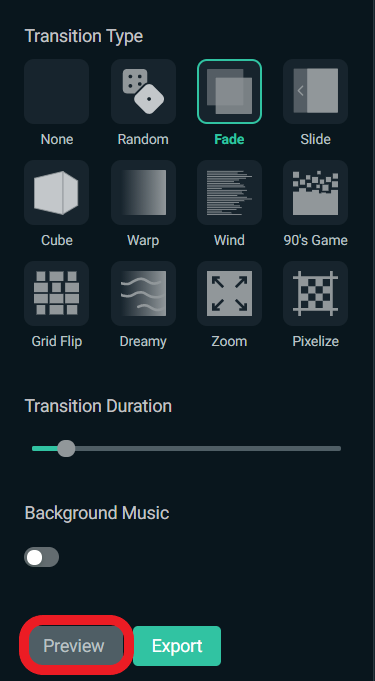
Streamlabs Highlighter comes with 12 distinct transitions that will appear between clips. To see a preview of these transitions, simply click the “Preview” button. The preview video is a low-resolution version of the finished video. The final video will have a higher resolution, framerate, and quality.
Add Background Music
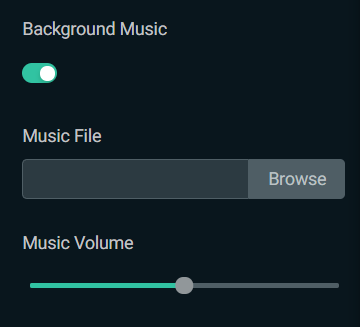
Browse and upload your own music files to add to your video. Remember, only use music you have permission to use.
Export Your Video
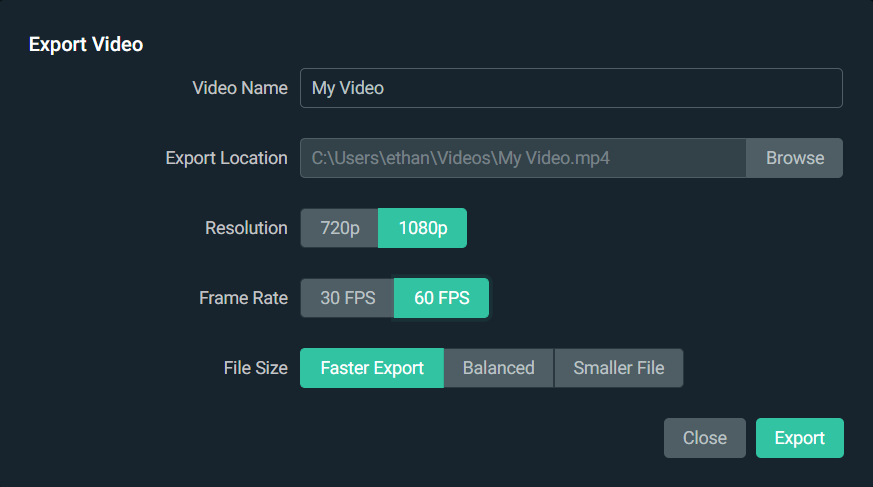
Export your work once you’re done editing by naming it, selecting an export location, and configuring your settings
Upload to YouTube
Add a title, description, and privacy settings before uploading to YouTube.
Please note: If you don’t already have a YouTube account linked to your Streamlabs account, you’ll be given the option to do so.
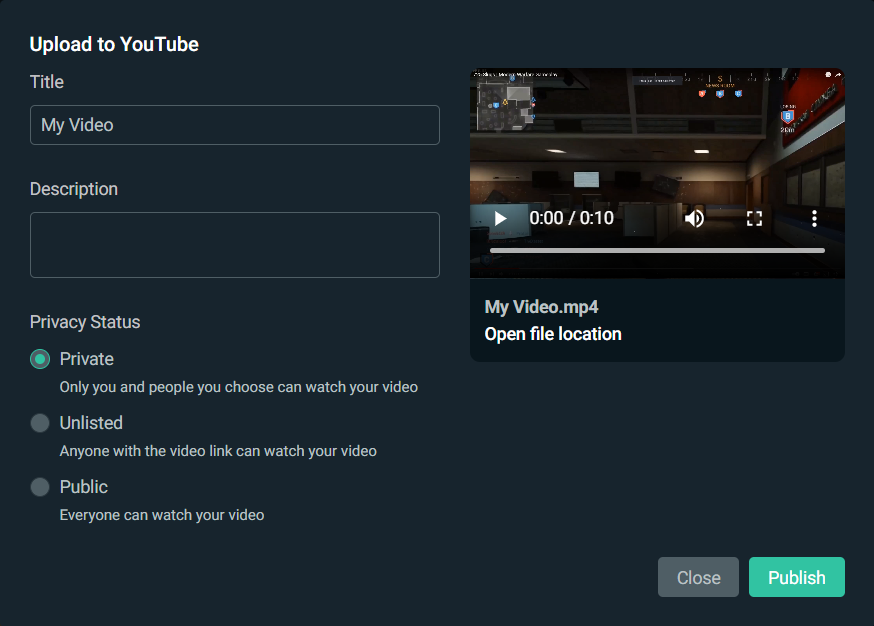
And now you’ve uploaded your stream highlights to YouTube without having to leave Streamlabs Desktop! To view your video, copy and paste the YouTube link into a browser.
Multi-Track Recording
When recording content in Streamlabs Desktop, you can assign audio inputs to specific tracks; this is useful when editing later to have desktop audio on one track while your microphone or other audio source is on another. Check out the steps below to set up Multi-track recording.
Step 1: Open Streamlabs Desktop, click on settings and click on “Output,” change the mode from “Simple” to “Advanced,” and click on “Recording”
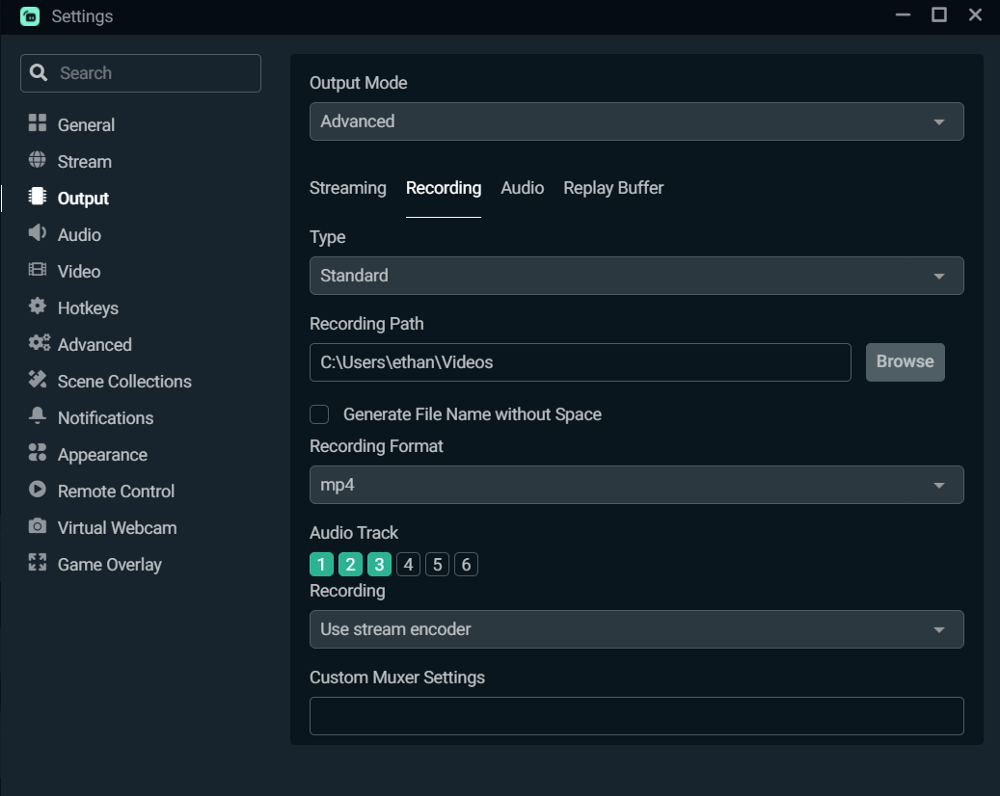
Step 2: Choose how many audio tracks you wish to record and click done. You can record up to six audio tracks. A variety of additional settings, including your recording path, file type, resolution, encoder, and more, can be customized from this page, as well.
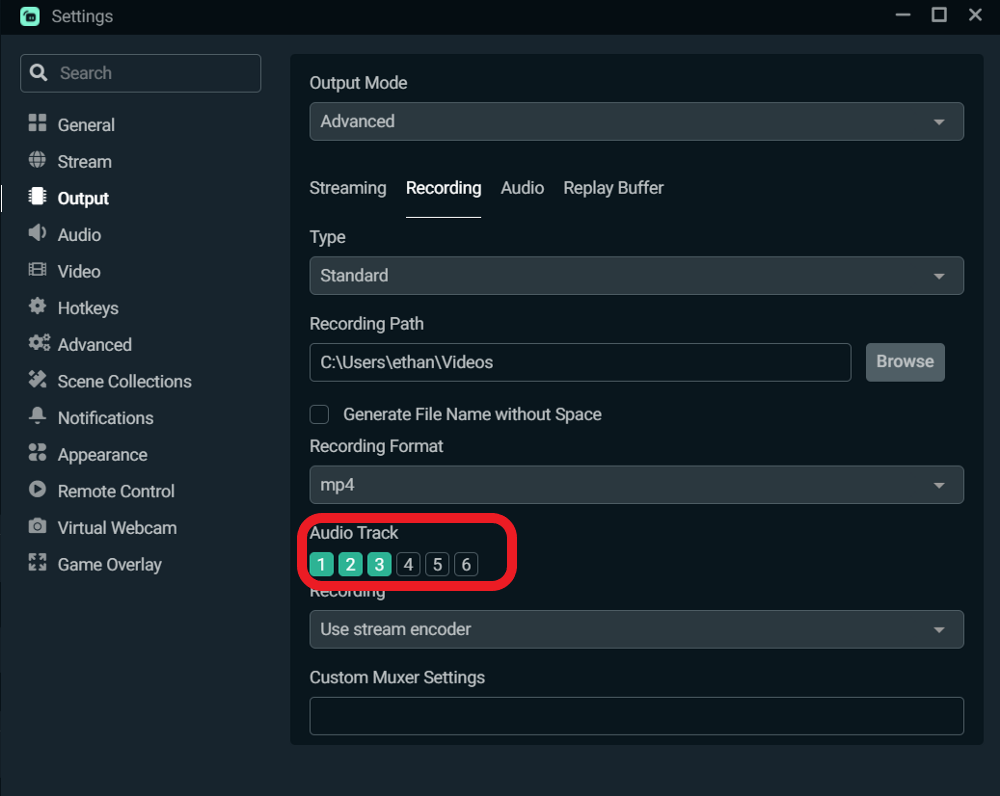
Note: Please change the recording format to MP4 or MVK to record multiple tracks. The default recording format, .flv, does not support multiple audio tracks.
Step 3: Open your advanced audio settings by clicking the settings cog in the audio mixer in Streamlabs Desktop.
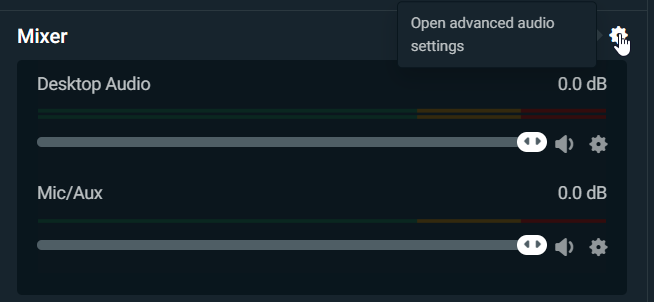
Step 4: Assign audio sources to specific tracks

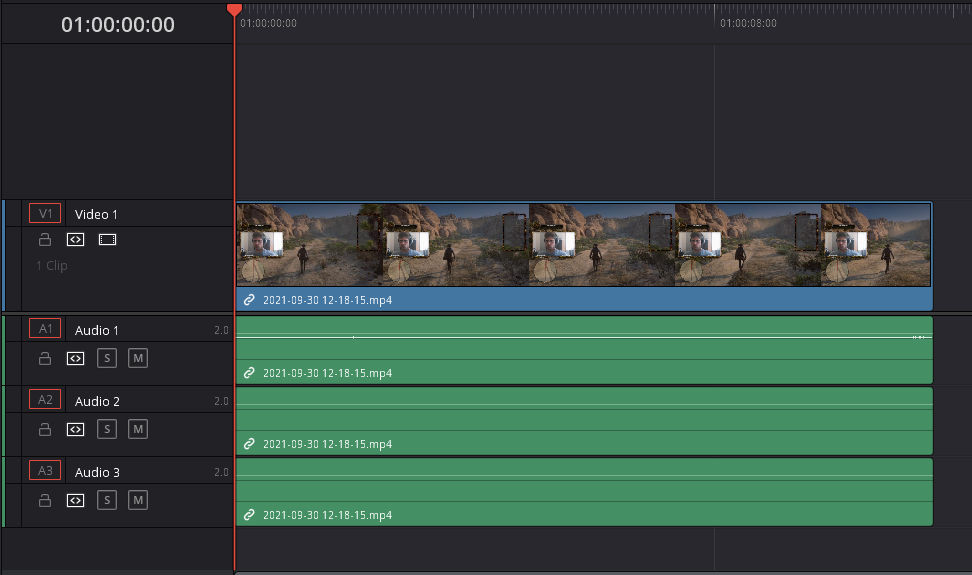
Step 5: Import your recording into your video editing software of choice, and you will now see your separate audio tracks.
Audio Settings
Before we get into which video settings you can adjust, we first want to ensure you capture the correct audio.
If you have a microphone connected to your computer, Streamlabs Desktop should automatically detect it and show it on the audio mixer.
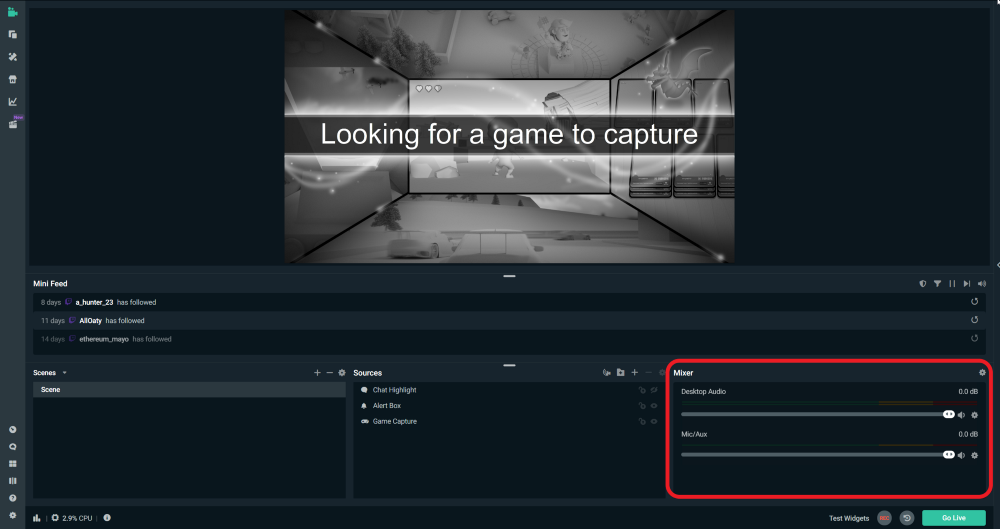
To change which microphone Streamlabs Desktop is capturing:
Step 1: click on the settings cog next to your Mic/Aux.
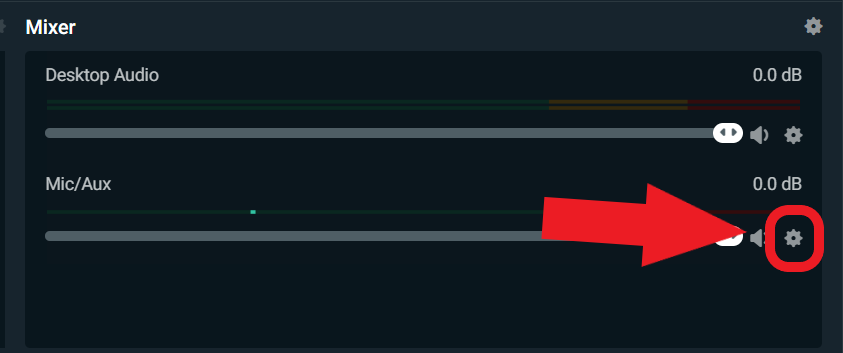
Step 2: Click on “Properties.”
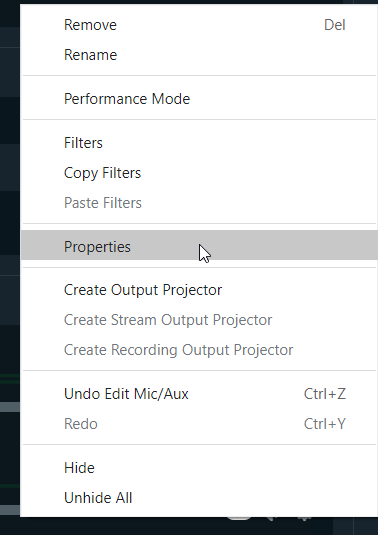
Step 3: Choose which device you want Streamlabs Desktop to capture

Video Settings
Now, let’s get into the video settings you should adjust to get the best quality picture.
Navigate to the video settings by clicking on the settings cog in the lower left-hand corner of Streamlabs Desktop and clicking on “video.”
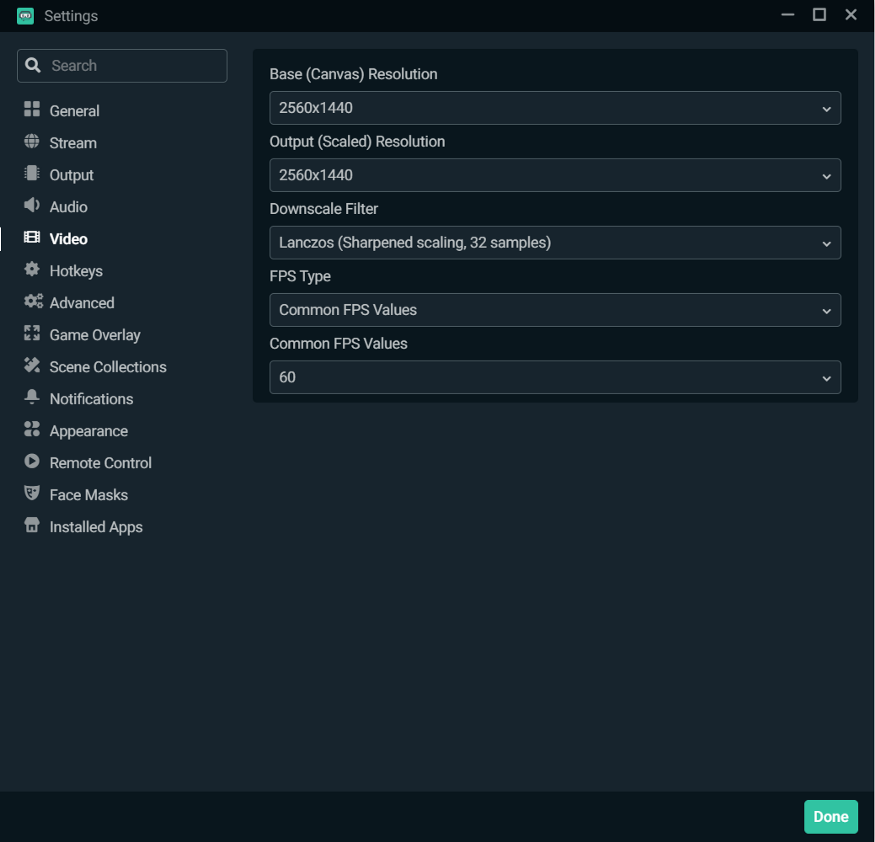
Base (Canvas) Resolution
For recording gameplay, we recommend that your base resolution matches your monitor’s resolution. In my case, it 2560x1440.
Output (Scaled) Resolution
For recording gameplay, it is recommended you choose the highest quality output resolution. In my case, it 2560x1440.
We recommend that you monitor the performance of your computer while you record. If you notice that your computer is struggling, try lowering the output resolution.
Downscale Filter
We recommend you choose Lanczos as your downscale filter, as this provides the best quality at the cost of slightly more CPU.
FPS
We recommend recording in 60 FPS in most cases, especially for gameplay that involves a lot of action. If you are playing a board game or something with a more static image, you can probably get away with 30 FPS, but in general, try to record more frames if you can.
Output Settings
To adjust the output settings for your recording, click on the settings cog in the lower left-hand corner of Streamlabs Desktop and click on “output.”
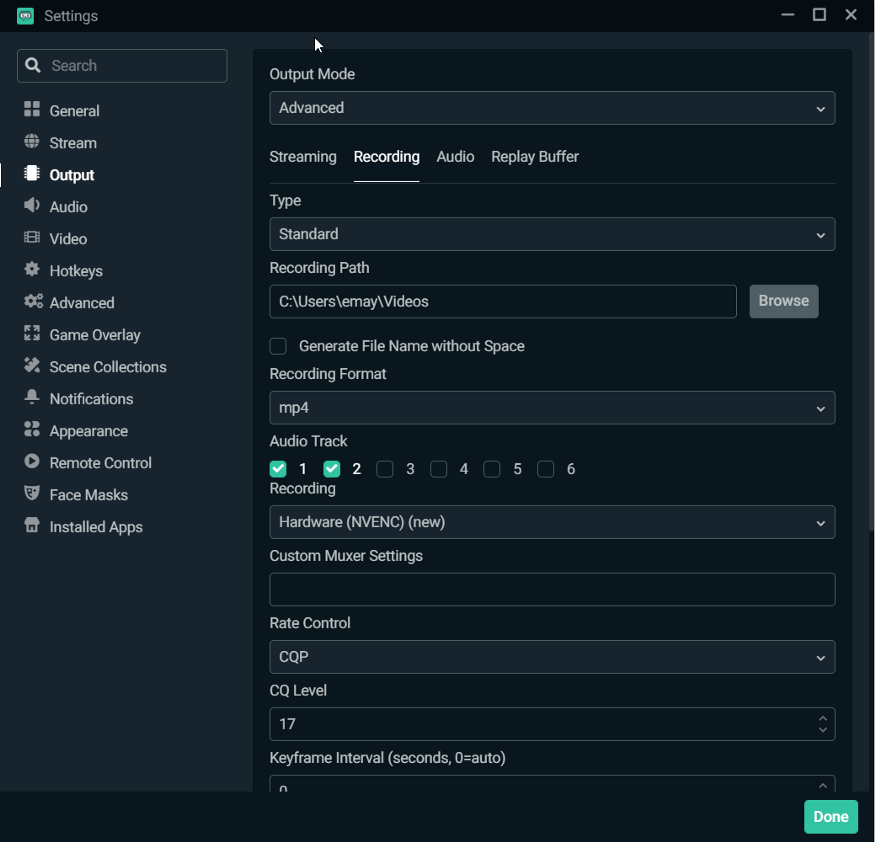
Recording Path
Pick the destination you’d like your recording to appear.
Recording Format
In most cases, we recommend recording in the mp4 format.
Recording Encoder
When it comes to encoders, there are two types: software (x264) and hardware (NVENC). The software encoder (x264) will use your CPU to encode video, while hardware encoders like NVENC will offload the encoding process to your GPU. If you are using an NVIDIA graphics card, we recommend you record with NVENC.
Rate Control
We recommend choosing CQP, which stands for Constant Quantisation Parameter. This will help control the amount of compression and video quality for any given frame you see.
If you are using the X264 encoder, we recommend choosing CRF for your rate control.
CQ Level
Large values mean that there will be higher quantization, more compression, and lower quality. Lower values indicate the opposite. We recommend starting at 17 and adjusting from there depending on the performance of your computer.
Keyframe Interval
You leave this setting as 0.
Presets
For recording purposes, we recommend choosing the highest setting, “Max Quality.” Of course, if you run into performance issues, please feel free to adjust this setting accordingly.
Profile
You can leave this setting on “high.”
You can leave the rest of the settings on their default states in this section as they won’t impact quality.
Test your Settings
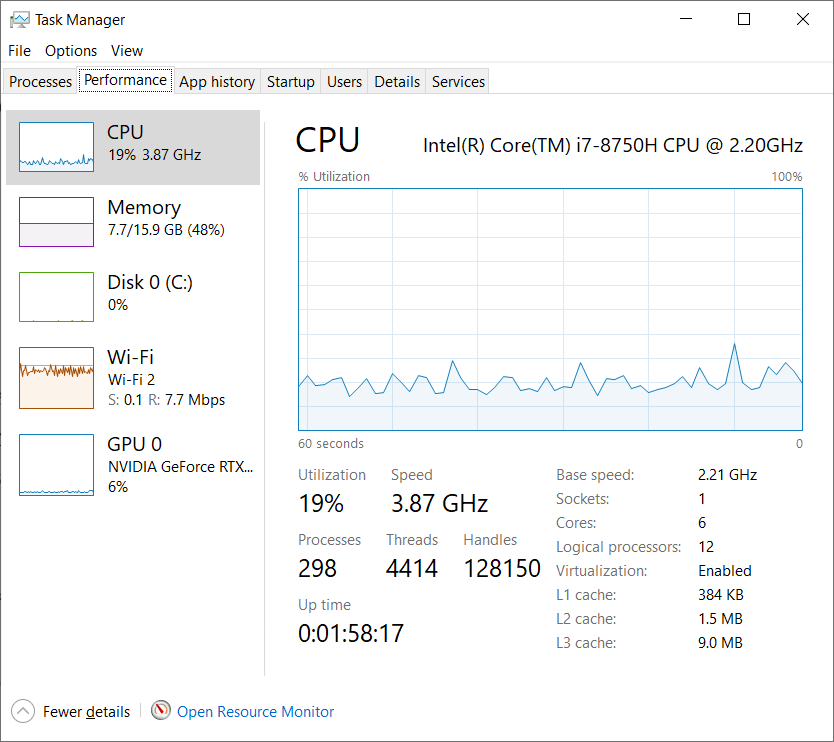
Now that you’ve adjusted the video and recording output settings to optimize for quality, you show now test to make sure your computer can handle the performance increases. Press Control + Shift +ESC to bring up the task manager and click on “performance.” Try recording gameplay with Streamlabs Desktop and monitor the performance on this screen. If your CPU usage is too high, try adjusting the settings outlined above to optimize your computer.
If you have any questions or comments, please let us know. Remember to follow us on Twitter, Facebook, Instagram, and YouTube.
About Streamlabs
Founded on the belief that we want to help creators make a living do what they love, Streamlabs provides a robust suite of features to help creators better engage with their fans, grow audiences, and improve monetization. Building on this mission, Streamlabs is expanding its product with 1) Talk Studio, our browser-based streaming studio, 2) Link Space, an all-in-one bio link tool, 3) Video Editor, a video review and collaboration tool. And 4) Cross Clip, the easiest way to convert Twitch clips to videos for TikTok, Instagram Reels, and YouTube Shorts.