It's a sad day when your most epic stream clip is lost to the ravages of time. The truth is that just because your clips are hosted on Twitch right now doesn't mean they'll be there forever. DMCA strikes on Twitch are an ever-present threat. Unfortunately, a clip that contains copyrighted content can be the cause of a channel strike or ban. Because of this, many creators are beginning to see the value in downloading their stream clips to avoid this unfortunate scenario.
If you're the type of creator who wants to cross-post your highlights to other social platforms to grow your audience (hint: if you're not, you should be), then your best option is to download those clips so you don’t have to worry about losing them later.
The solution: save those clips with Cross Clip! Take back control over your video archive, so you never miss out on an amazing moment.
Okay, that's not the only way to save your clips, but if you're looking for the simplest way to convert Twitch clips to TikTok, Instagram Reels, or YouTube Shorts, Cross Clip is your best bet.
In this article, we'll show you the easiest ways to save your Twitch clips, and how to post them on your social media. Let's get started.
How to Save Your Clips on twitch
When it comes to saving your Twitch clips you have two options.
- Download your clips from Twitch
- Use a Twitch clip converter like Cross Clip
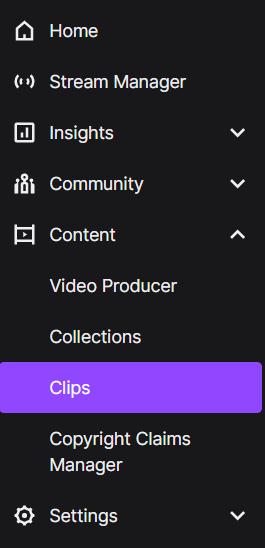
Downloading your Twitch clips directly from the platform is a fairly straightforward process. First, head to the Twitch Creator Dashboard. On the left navigation bar, expand the category called “Content” and click on “Clips”.

Now you can look at every single clip that people have created for your channel. Simply download them and save them to your computer.
How to Save Twitch Clips using Cross Clip
The main issue with saving clips via Twitch is that you still have to manually save, upload, and edit your clips if you want to share them to your social media. Since each social media platform requires specific dimensions, directly uploading your saved clips can be a bad user experience for your viewers. Enter Cross Clip.
This new tool, made with love from the team at Streamlabs, automatically converts your Twitch clips for apps like TikTok, Instagram Reels, and YouTube Shorts. Conversion takes only two to three minutes and can be completed with a single click. Now streamers can share their content across multiple platforms without manually editing each video clip before uploading it. Ready to learn how? Great, let’s dive into it.
Upload Your Clips
With Cross Clip, you can automatically enter the URL of your Twitch clip from the landing page, and we’ll upload the video and convert it to the appropriate size, depending on which social media platform you want to use.
Editor Mode
After you upload a clip, you’ll be brought to the editor. The default layer comes with a content box and a camera box. You can drag and drop these boxes across the canvas to highlight a portion of the clip and scale the boxes up or down if you'd like to zoom. You can also add additional layers to highlight more sections of your video!
Store Your Uploads
In the 'My Clips' section, you can store all of your clips in one place, saving valuable storage space on your computer. You can see all of the clips you’ve created and even go back and re-edit them if you'd like.
Want to learn more about using Cross Clip? Check out our blog post, Getting Started With Cross Clip, to learn everything you need to know!
We hope this article helps you create awesome content for your viewers. Don’t forget to follow us on Twitter and TikTok to stay up-to-date on the latest news from Cross Clip!
Happy clipping!