

Adding a Sub Goal Widget is a great way to motivate your audience to subscribe to your content, in a community driven way.
In this blog, we'll cover (click a section below to skip ahead):
- How to Customize Your Sub Goal Widget (Streamlabs Dashboard)
- Advanced: Setting up Platform Specific Sub Goal Widgets
- How to Set Sub Goal Widget (Streamlabs Desktop)
- How to Set Up Streamlabs Sub Goal Widget in OBS Studio
How to Customize Your Sub Goal (Streamlabs Dashboard)
Below we're setting up a Sub Goal for all platforms connected to our Streamlabs account-these platforms share the Goal Amount.

Note—You can set up platform specific goals by creating Sub Goal widgets on different widget themes (each widget theme attached to a specific sub goal- e.g. A green sub goal widget theme for Kick, purple for Twitch etc.). More on that below in the Advanced section.
Step 1: Log in to your Streamlabs Dashboard and click All Widgets from the left-hand navigation bar. Click Sub Goal under the Goals section.
You can also click here to get directly to the settings page for the Sub Goal Widget.

Step 2: Use the Manage Goal panel to enter your goal title, goal amount, starting amount, and end date. You can also choose whether you want your goal to track subscribers or sub points (useful for affiliates/partners who receive multiple points for higher tier subs).
Make sure to save your customizations to start the goal.


Step 3: Use the Platform dropdown to specify which events count toward the goal-this includes:

Twitch
- Subscriptions
- Resubs (optional/unselected in this screenshot)
- Sub Gifts
- Prime Subs
YouTube
- Members
- Gifted Members
- Supports
- Support Gifters
Kick
- Subscribers
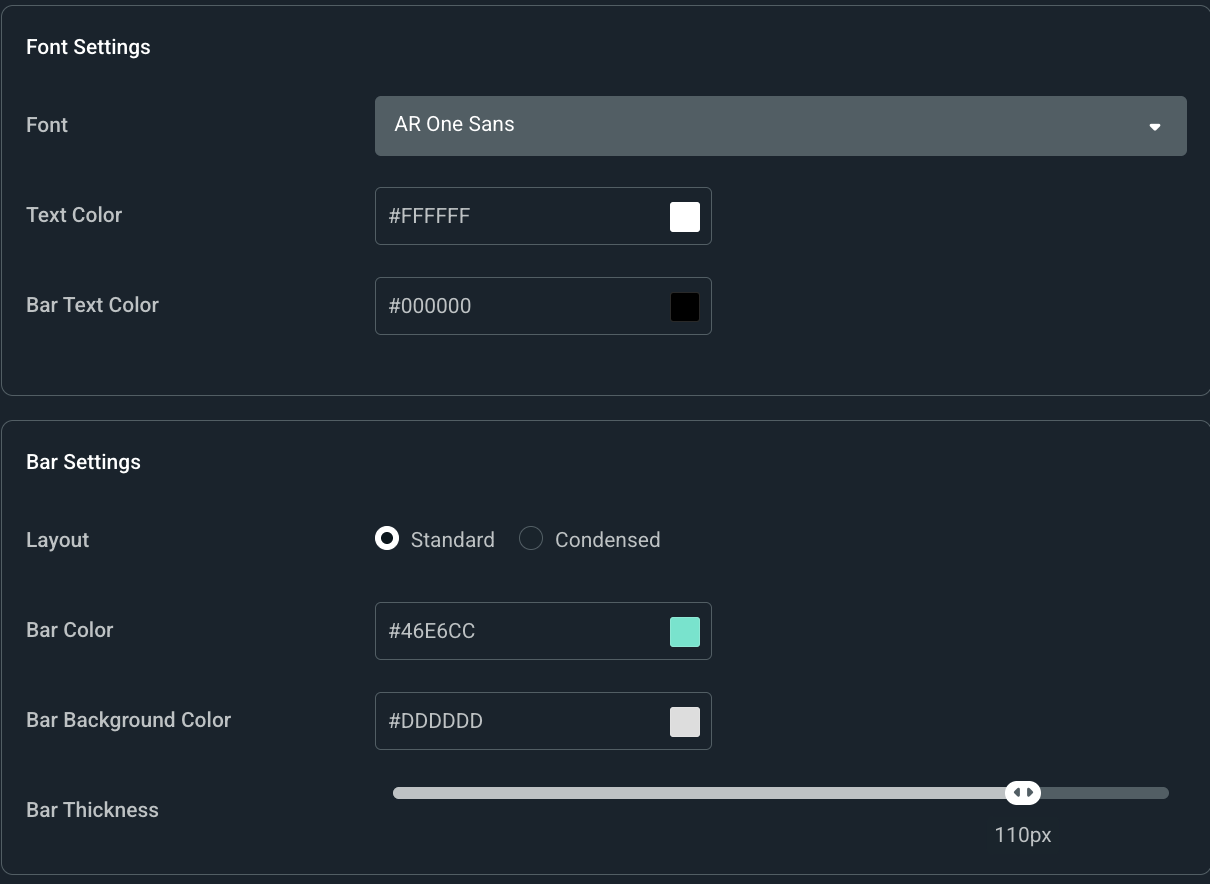
Step 4: Customize the look of your goal bar by adjusting the layout, colors, font, and bar thickness. You'll see a live preview (with sample data) as you make changes.
The background is for preview purposes only-the live widget will have a transparent background on stream.
Step 5: Enable HTML/CSS to take full control with advanced customization (if you wish). FYI, changes made here will override all other changes made.

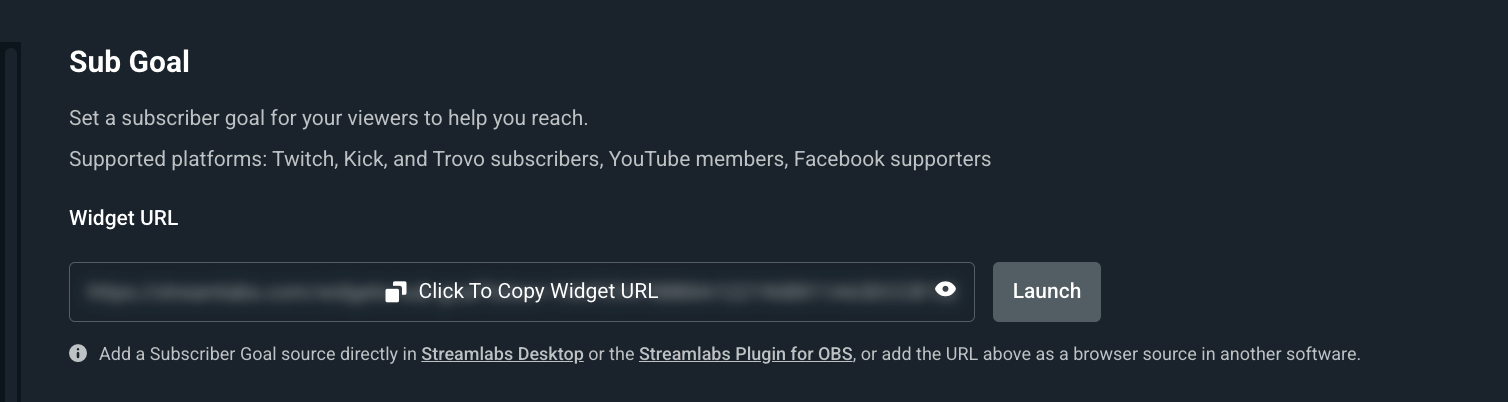
Step 6: Click Save Settings and copy the Widget URL to paste into any broadcast software that supports browser sources (e.g. OBS Studio, XSplit etc.).If you're using Streamlabs Desktop or the Streamlabs Plugin for OBS, you can find the steps for adding the widget in the desktop applications as its own Source later in this guide.
We'll cover setting up platform specific goals next.
Advanced: Setting up Platform Specific Sub Goal Widgets
If you want to have different widget goals for specific platforms, you can do this with widget themes. Essentially, you'll need to create a new sub goal for each theme, with each theme being tied to a different platform.
Below is a screenshot of three different widgets themes we have set up. Each is named for the platform it will be used with.

Note—Do not use the default theme. Only use manually added themes to set up different sub goal widgets.
If you need to create a new theme, click the Create Widget Theme button. In the example below, we created the "Twitch Sub Goal" theme which will be where we'll make a sub goal widget specific to that platform. Rename the theme, add a description, then click Create to add to your list.


You also have the option of browsing premade themes.
Step 1: Customize a sub goal widget for each theme by following the steps in the above section, ensuring you have the correct widget active. For example, we created a "Twitch Sub Goal" widget making sure we're working off the Twitch Sub Goal widget theme.

Step 2: Go to your widget themes and click the link icon next to the theme you wish to grab the sub goal widget for.

Step 3: Find the link for the sub goal widget in the list and copy by clicking the copy icon next to it.

Step 4: Open Streamlabs Desktop or your streaming software of choice and find the option to add a Browser Source. In Streamlabs Desktop, this would be Plus Sign (+ in main editor > Browser Source >Add Source.

Step 5: When prompted, we recommend naming the source "[Platform name] Sub Goal" so you don't mix them up in your sources list. Hit Add Source once you've input a name.

Step 6: Paste the link for the sub goal in the URL field. When you're done, press Close.

Step 7: The sub goal widget will appear on screen for you to resize, drag etc. to fit your layout. Repeat the steps above to create more platform specific sub goals.
FYI, you cannot set up separate (e.g. platform specific) Sub Goal Widgets as sources directly in Streamlabs Desktop (only the currently selected widget theme's Sub Goal widget will show). You must copy and paste these links as separate Browser Sources as we walked through above.
How to Add a Sub Goal Widget in Streamlabs Desktop (Natively)
If you're using one sub goal widget to track multiplatform events (e.g. Subs on Twitch, YouTube and Kick), you can add a sub goal widget natively in Streamlabs Desktop.
Step 1: Open Streamlabs Desktop and navigate to your Editor tab.
Step 2: Click the plus sign (+) in your Sources Panel to add a new Sub Goal widget source.

Step 3: Select the Subscription Goal widget from the list.
Step 4: Name your source or keep the default name and click Add Source.
Note—If you previously set up the widget on your Streamlabs Dashboard, the setting for the widget should appear. If so, review your settings and skip down to step 8.
Step 5: In the Goal tab, customize your goal title, goal amount, starting amount, and end date. This is also where you'll click Start Goal to activate the widget.

Step 6: Under the Visual Settings tab, you can adjust the appearance of the goal bar-including layout, colors, fonts, and thickness.
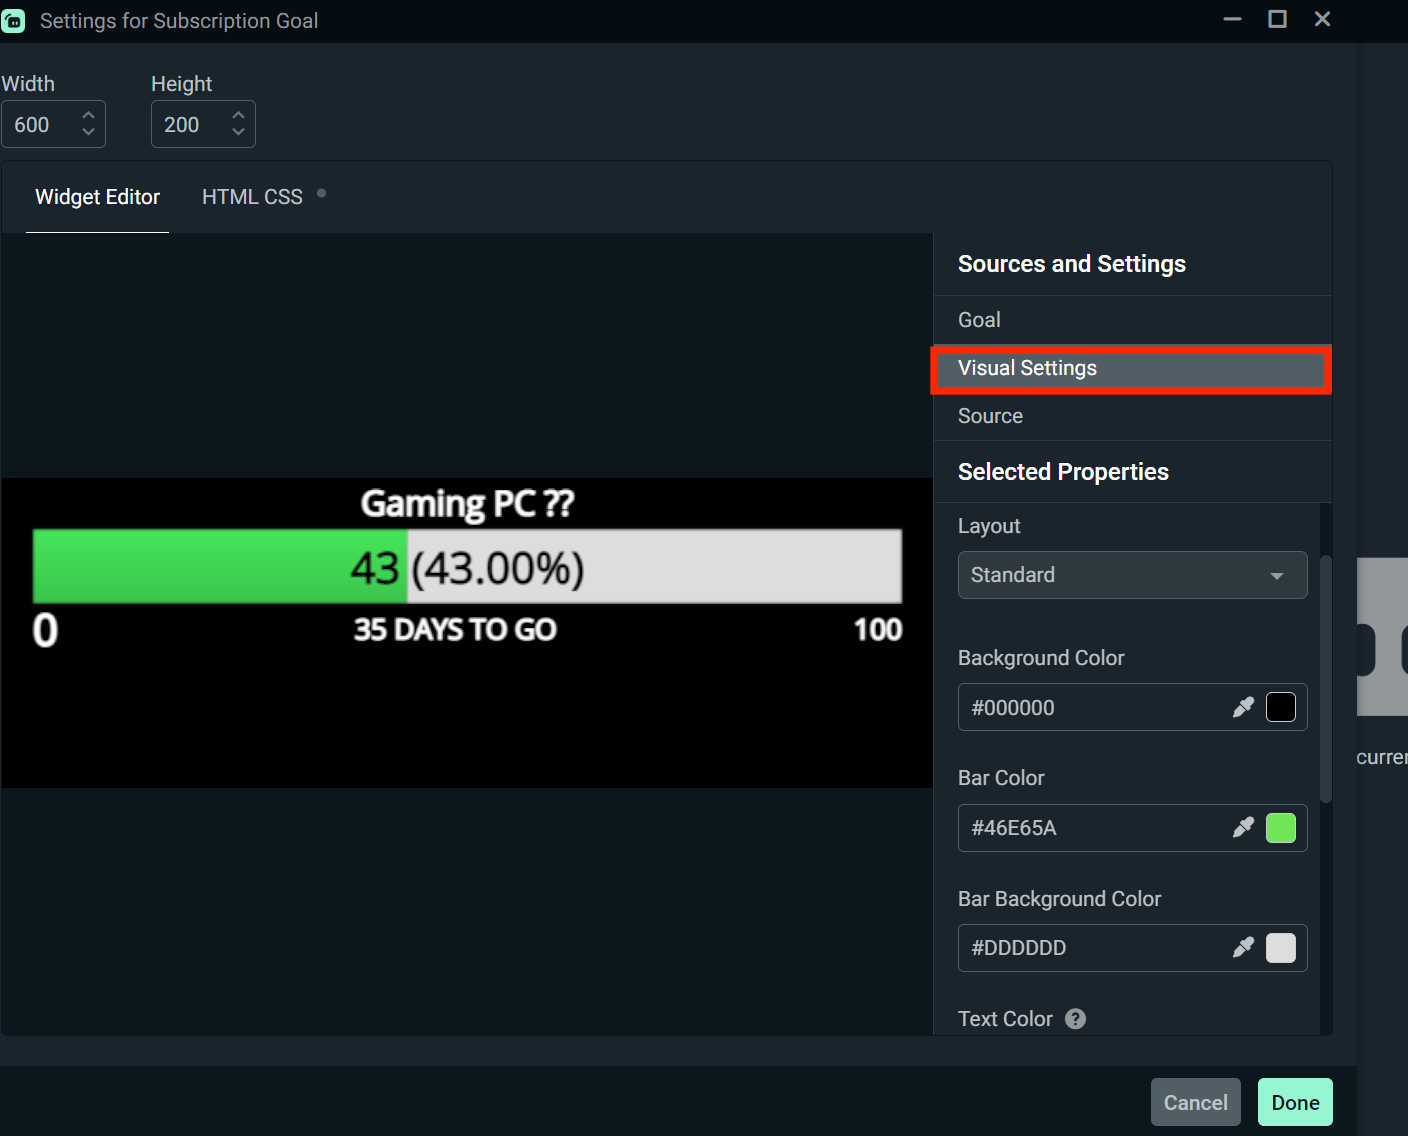
Step 7: Use the Source tab to make advanced customizations such as adding HTML or CSS, audio and shutdown controls, and more.

Step 8: Click Done to save your sub goal widget settings and add it to your current scene.
Now, you're ready to hit the Go Live button and stream to your audience using the Sub Goal Widget. Don't forget to make reaching your sub goal more exciting with one of these Sub Goal stream Ideas.
How to Set up the Streamlabs Sub Goal Widget in OBS Studio
If you prefer using OBS Studio but want seamless integration with Streamlabs widgets, the Streamlabs Plugin for OBS is the solution. Below is how to set up the Sub Goal Widget in OBS Studio using our plugin.
Step 1: Open OBS Studio and make sure the Streamlabs Plugin for OBS is installed and you're logged in. You can use this step by step guide if you need a walkthrough.
Step 2: In the top navigation panel, click Streamlabs. This will take you to all settings for the Streamlabs for OBS plugin.
Step 3: From the widget list, select Sub Goal, then click +Add. If you need to adjust your widget settings (like colors, layout, or goals), click Settings to go to your Streamlabs Dashboard.
Step 4: The Sub Goal widget should now appear under Sources in OBS Studio. You can drag, resize, and position it like any other source.
Note—f you want to add individual Streamlabs Sub Goal widgets in OBS Studio, follow the advanced steps above to add each as a browser source.
Once it's added, the Sub Goal widget becomes a powerful tool for keeping your audience amped when helping you reach your goals.
No matter what platform you're looking to gain subs on, the Sub Goal widget helps you visualize progress and motivate your community. Customize it to fit your platform and stream vibe, then watch your goals come to life.